User Manual
… visits


Positron Media Foundry takes ordinary pictures and video and turns them into the two formats the TFT & EPD Graphic Library 2 knows how to display on a TFT panel: a raw RGB565 byte stream written to an SD card, or a Flash16 HEX table compiled directly into your PIC's program memory. Either way, the pixel format is the same — 16 bits per pixel, 5 bits red, 6 bits green, 5 bits blue — only the storage location differs.
Point it at a batch of images or clips, set the target width and height for your panel, and it handles the rest: scaling, optional cropping, optional rotation, flattening transparency against a background color, and — for the SD card path — writing the result to raw sectors along with an index your firmware can walk to find each file, plus a ready-to-paste block of Positron $define lines. Every converted file lands in the app's own TEMP folder, so you can always Convert Only, check the result with TFT Preview, and only then commit to writing a card.
Two card index formats are available, chosen with the Mode dropdown: Modern (the default), a file table that also stores each file's alias, name, pixel size, exact length, CRC32 checksum and write date on the card itself, and lets individual slots be freed and reused; and Legacy, the original compact index. See Legacy and Modern mode.
This manual covers the desktop application only. For the library's own display functions, panel setup, and driver-level detail, see the TFT & EPD Graphic Library 2 reference manual.
There's no installer — copy the application folder wherever you like, with ffmpeg.exe, ffprobe.exe and ffplay.exe alongside the executable, and run it. The app creates its own TEMP, TestPatterns, REPORTS and DOWNLOAD folders next to the executable the first time it needs them.
On launch, Windows will prompt for administrator approval; this is expected and covers the whole session. If ffmpeg.exe or ffprobe.exe aren't found next to the app, you'll see a warning immediately — conversion will fail until they're in place.
Only one copy of the app can run at a time. Opening a second instance shows a notice and closes itself, rather than risking two instances writing to the same SD card at once.
The window has three parts, top to bottom:
The toolbar's actions:
|
Control |
What it does |
|
TFT Preview |
Shows a row's already-converted output on a panel-sized canvas. |
|
Panel W: / H: |
The physical panel size Preview draws against. Default 320×240. |
|
Add Row |
Adds one empty row to the batch grid. |
|
Rotate |
0°/90°/180°/270°, applied to the whole batch. |
|
Mode |
Legacy or Modern card index - see Legacy and Modern mode. |
|
Convert Only |
Converts the batch into the app's TEMP folder; writes nothing to a card. |
|
Convert & Write |
Converts, then writes the whole card from scratch, in the selected Mode. |
|
Convert & Append |
Converts, then adds to what's already on the card, in the selected Mode. |
|
Image to HEX |
Generates a Flash16 declaration for each picture row and previews it. |
|
Test Pattern 1 |
Adds a generated color-bar row for testing without real assets. |
|
Test Pattern 2 |
Adds a generated broadcast-style test-card row. |
|
Add Folder |
Adds a row for every supported file in a folder at once. |
|
Background color |
The swatch button; sets the transparency fill color. |
|
Verify Card |
Shows what's recorded on a card - a summary (Legacy), or a browsable, CRC-checked list where slots can be freed (Modern). |
|
Format System |
Opens the standard Windows Format dialog. |
|
Format RAW |
This app's own full-card sector erase, with progress. |
|
Copy HEX |
Copies the last HEX run's declarations to the clipboard. |
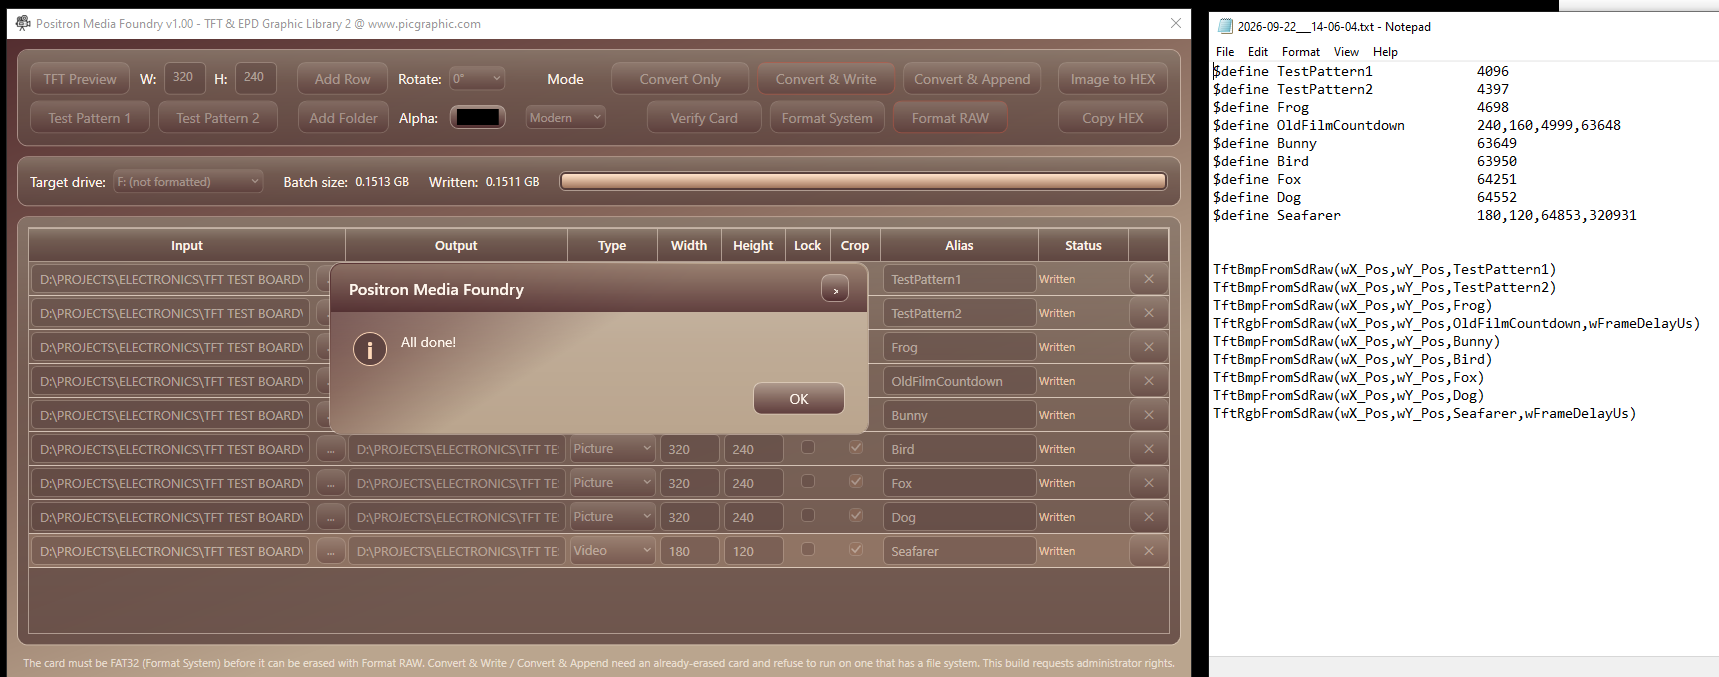
The batch grid and the report produced after a successful write.
Each row in the grid is one file. Use Add Row and its ... Browse button for a single file, or Add Folder to add every supported picture and video found directly inside a folder at once (subfolders aren't scanned).
Picking a file with Browse (the ... button) or importing with Add Folder sets each row's Width/Height to that file's own pixel dimensions automatically, read directly from the file - so a row starts out matching its source, not a guess. This only happens the moment a fresh row's size is still blank; picking a different file on a row that already has a size set leaves that size alone. If a file's dimensions can't be read for some reason, Width/Height falls back to whatever another row in the batch already has set (so the batch stays at one size without retyping it every row), and failing that, to the panel W:/H: boxes in the toolbar. The Test Pattern buttons always use that row/panel fallback rather than a native size, since a test pattern's own dimensions aren't a meaningful target size for your panel.
|
Column |
What it does |
|
Input |
The source file. Read-only text so you can click in and select a long path in full; use the ... button to change it. |
|
Output |
Where the converted file will be written — always in this app's own TEMP folder next to the executable, never next to the source. Named <source name>_<width>x<height>.bmp for pictures (.rgb for video), so re-converting the same row at a different size never collides with an older output. Read-only, filled in automatically. |
|
Type |
Picture or Video, detected from the file extension. Change it by hand if a file was misdetected. |
|
Width / Height |
The target size in pixels — defaults to the source file's own dimensions (see above); change either to target your panel's resolution or a sub-region of it. |
|
Lock |
Checked by default. While checked, editing Width or Height recomputes the other to keep the same proportion - so a row that started at its file's native size keeps that aspect ratio as you resize it. Uncheck it to set Width and Height independently, e.g. to stretch deliberately. |
|
Crop |
Checked: crops symmetrically from the center to preserve the source's aspect ratio before scaling. Unchecked: stretches to Width × Height, ignoring the source's proportions. |
|
Alias |
The name used in the generated Positron $define or Flash16 declaration (and, in Modern mode, stored on the card itself). Letters, digits and underscores only. |
|
Status |
What happened the last time this row ran — converting, converted, written, or failed. Hover it: the tooltip carries the full reason on a failure (ffmpeg's own error text), not just the word "Failed". |
Lock vs. Crop
These solve different problems and both can be on at once. Lock keeps Width and Height themselves in proportion as you type - it changes what target size you end up with. Crop decides how the source image gets fitted into whatever Width × Height is already set - it never changes the target size itself, only how the source is cropped or stretched to reach it.
A row left completely empty (no input, no size, no alias) is ignored by every action below — you don't need to delete a spare blank row before converting.
The Rotate dropdown in the toolbar applies a clockwise rotation — 0°, 90°, 180° or 270° — to every row in the batch, before cropping and scaling. It's a batch setting rather than a per-row one: if you're prepping assets for a panel mounted rotated relative to how your source images were shot or drawn, set it once and it applies to everything you convert until you change it back.
Rotation runs first in the pipeline specifically so that Crop and the target Width/Height always apply to the image in its final, on-panel orientation — a portrait source rotated 90° for a landscape panel is cropped and scaled as landscape content, not as a rotated portrait one.
Because the panel W:/H: boxes next to TFT Preview describe the physical panel rather than any one row's target size, crossing between an unrotated orientation (0°/180°) and a quarter-turned one (90°/270°) swaps those two boxes automatically — going 0°→90° swaps them, going 90°→270° doesn't, since both are already the sideways orientation.
RGB565 has no alpha channel, so a PNG with transparent or partially transparent pixels — an icon with soft anti-aliased edges, for instance — has to be flattened onto a solid color before it can be stored. The swatch button in the toolbar sets that color; click it to open a color picker, and every conversion afterward blends against it using standard alpha compositing:
output_color = src_color × alpha + background_color × (1 − alpha)
The default is black. A partially transparent pixel's resulting color depends on this choice — the same soft edge will look different flattened onto white than onto black — so for icons with meaningful edge transparency, it's worth setting this to whatever color will actually surround the image on your panel before converting.
This applies identically whether you're using Convert Only, Convert & Write, Convert & Append, or Image to HEX — the same flattening happens in every path, so a HEX table and an SD-written copy of the same source always agree.
Three toolbar buttons run a batch through FFmpeg. All three convert every non-empty row; they differ only in what happens to the result.
Converts every row and places each output file in this app's own TEMP folder (see Building a batch for the naming convention). Nothing is written to a card. Run this before TFT Preview — Preview only shows what's already here, it doesn't convert anything itself.
Destructive
Erases everything already on the selected drive. There's no undo.
Converts the batch, then writes it to the selected drive as raw sectors starting from the very beginning of the card, creating a fresh index as it goes — in whichever format the Mode dropdown is set to (see the next chapter). Use this the first time you write to a card, or whenever you want to start over.
Converts the batch and writes it after whatever a previous Convert & Write already placed on the card, extending the existing index rather than replacing it. This needs that index to already exist, in the same Mode it was written in (see Legacy and Modern mode) — run Convert & Write at least once on a card before appending to it.
In Modern mode, Append first reuses any free slot (a file deleted in Verify Card) that's big enough for the file being written, and only adds new slots at the end when none fits - see Freeing and reusing slots.
Needs an already-erased card
Both buttons refuse to run — with a warning, rather than proceeding — on a card that still has any recognized file system on it (FAT32, exFAT, NTFS, whatever Windows reports). They need a card Format RAW has already erased. See Formatting a card for the full FAT32 → Format RAW → Convert & Write sequence this expects the first time you use a card. This applies the same way in either Mode.
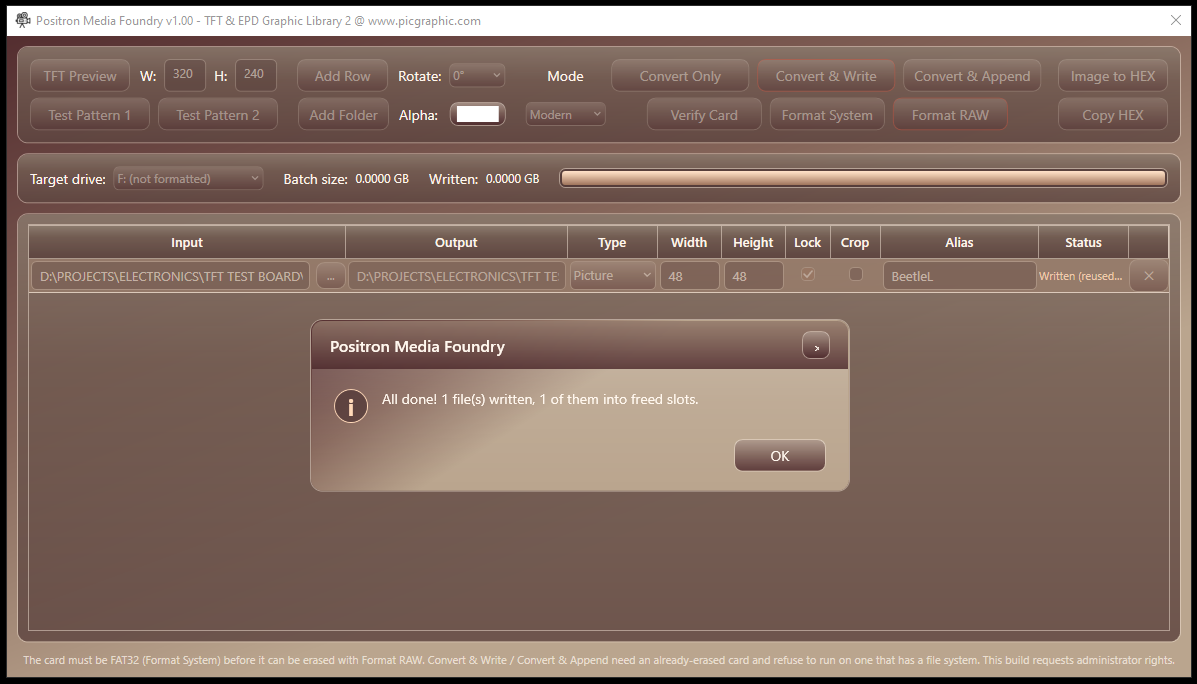
Convert & Append reports when a file has reused an available slot.
The Mode dropdown in the toolbar picks how Convert & Write, Convert & Append and Verify Card index the card. Everything else in the app — conversion, rotation, background color, TFT Preview, test patterns — works identically no matter which Mode is selected; only the card's own index format changes.
|
|
Legacy |
Modern |
|
Index size |
8 sectors (4 KB) |
4096 sectors (2 MiB) |
|
Max files per card |
1024 (the index's 4096 bytes ÷ 4) |
16384 |
|
First data sector |
8 |
4096 |
|
Alias / name stored on the card |
No - only in the matching REPORTS file |
Yes |
|
Width, height, length, frames, fps stored |
No |
Yes |
|
CRC32 integrity check |
No |
Yes |
|
Write date and time |
No |
Yes |
|
Free a file and reuse its space |
No |
Yes |
|
Verify Card shows |
A text summary |
An interactive, browsable, playable list |
The two formats don't mix
A card written in one mode cannot be read as the other format. Convert & Append and Verify Card must use the mode originally used to write it. To change modes, rebuild the card using Format System (FAT32) → Format RAW → Convert & Write in the new mode. This replaces its existing contents.
This chapter describes Legacy mode's index - see The Modern mode header table for Modern's.
When you write to a card, the app bypasses its file system entirely and streams data to raw sectors — the same 512-byte units the storage hardware itself works in. This is much faster to read back sequentially from firmware than parsing a real file system would be, at the cost of the card no longer looking like a normal FAT32 volume to Windows once you've written to it.
A tiny index makes it possible to find each file again: the first 4096 bytes of the card (8 sectors) hold one 4-byte number per file, each recording the sector immediately after that file ends. The first file's data always starts right after the index, at sector 8; every file after that starts where the previous one's number says it ends. Reading a file back — or figuring out where to append the next one — only ever needs sequential sector reads, no directory lookups.
|
Region |
Contents |
|
Sectors 0–7 (4096 bytes) |
Index — one 4-byte little-endian end-sector value per file, in order. |
|
Sector 8 onward |
File data, back to back, each one padded up to the next 512-byte boundary. |
Pictures are copied byte-for-byte as BMP files, structure and all. Video is written as a raw sequence of 16-bit RGB565 values — one frame after another with no container or timing information — which is why the generated Positron code needs to be told the frame's width and height separately.
Modern mode reserves the first 4096 sectors of the card for a fixed file table of 16384 slots, 128 bytes each: 16384 × 128 = 2,097,152 bytes, exactly 2 MiB, or 4096 × 512-byte sectors. File data begins right after the table, at sector 4096. Each slot carries everything the firmware — or Verify Card — needs to find, identify, play back and integrity-check a file without any separate REPORTS file, including a video's frame size and frame rate, which a raw RGB565 stream has no way to carry on its own.
Fields are packed with no gaps, and every multi-byte number is big-endian (most significant byte first).
|
Bytes |
Field |
Notes |
|
0 |
Media Type |
0 = BMP, 1 = RGB, 64 = free (deleted, reusable), 128 = empty (never used) |
|
1–4 |
Start Sector |
32-bit unsigned - first sector of the file |
|
5–8 |
Stop Sector |
32-bit unsigned, inclusive - last sector holding the file's actual data (not one past the end, the way Legacy's index works) |
|
9–12 |
Allocated Stop |
32-bit unsigned, inclusive - last sector the slot owns. Set once when the slot is created and never lowered; see Freeing and reusing slots |
|
13–14 |
Width |
16-bit unsigned, pixels |
|
15–16 |
Height |
16-bit unsigned, pixels |
|
17–20 |
Data Length |
32-bit unsigned - exact file size in bytes, without the zero padding up to the next sector boundary |
|
21–24 |
Frame Count |
32-bit unsigned - RGB: number of frames (Data Length ÷ (Width × Height × 2)); BMP: 0 |
|
25–26 |
Frame Rate ×100 |
16-bit unsigned - RGB: frames per second × 100, e.g. 2500 = 25.00 fps, 2997 = 29.97 fps; BMP or unknown: 0 |
|
27–30 |
CRC32 |
32-bit unsigned - checksum of the Data Length bytes (see CRC32 below) |
|
31 |
Day |
1–31 |
|
32 |
Month |
1–12 |
|
33–34 |
Year |
16-bit unsigned, e.g. 2026 |
|
35 |
Hour |
0–23 |
|
36 |
Minute |
0–59 |
|
37 |
Second |
0–59 - the date and time are the PC's local time when the file was written |
|
38–77 |
Alias |
40 bytes: up to 39 ASCII characters, then a 0 terminator |
|
78–117 |
Original Name |
40 bytes: up to 39 ASCII characters, then a 0 terminator |
|
118–127 |
Reserved |
Always 0 - 10 bytes free for future use |
The Alias and Original Name fields always start at the same offsets. The text runs until its 0 terminator, and everything after it within the field is also 0. The Original Name is the source file's name without its extension - Media Type already says whether it's BMP or RGB.
Slots are filled in order from 0, and the table ends at the first slot whose Media Type is 128 (never used). A card that was only zero-filled by Format RAW and never written in Modern mode is treated the same way: a Start Sector of 0 is impossible for real data, since the table itself occupies the first 4096 sectors.
A slot with Media Type 64 is free: its file was deleted in Verify Card, but the slot still owns its area of the card and keeps its Start Sector, Allocated Stop, names and date. Free slots sit in the middle of the table, so anything walking it must skip type 64 and carry on - not stop there.
Deleting a file in Verify Card (the ✕ button) marks its slot free. Nothing else about the slot changes, and the file's data stays on the card until something overwrites it.
A slot's size is fixed the first time it's created: it runs from Start Sector to Allocated Stop, and that area never grows or shrinks afterwards. A later file can reuse a free slot only if it is the same size or smaller. When it does, it keeps the slot's Start Sector and Allocated Stop, and only Stop Sector moves to where the new, smaller data ends - so the slot's full original capacity is still there the next time it's freed and reused.
Convert & Append in Modern mode reads the whole table once at the start and makes every placement decision against that in-memory copy. For each file in the batch, in order:
The file's data is always written before its table entry. If a write fails partway, a reused slot is still marked free and nothing points at the half-written data. The table itself is written once at the end - or earlier, if a later file fails, so every file already written successfully is still recorded. Free slots also release their alias and name, so a new file can take them. A reused slot shows as Written (reused slot N) in the Status column.
Slot order is physical order
A new slot is only ever created at the end of the table, with its data after every other slot's area, and a reused slot keeps its original Start Sector. So slot numbers always follow the order of the data on the card, and the first sector available for a brand-new slot is simply the highest Allocated Stop + 1.
The checksum is the standard CRC-32 used by ZIP, PNG and Ethernet (IEEE 802.3): reflected polynomial 0xEDB88320, initial value 0xFFFFFFFF, final XOR 0xFFFFFFFF. Its check value - the CRC32 of the ASCII text 123456789 - is 0xCBF43926, so any standard tool or a small table-driven routine in firmware produces the same number. It covers exactly the Data Length bytes, not the zero padding after them, and is computed on the same buffers as they're written to the card, so it adds no extra pass over the file.
For video, the stored Frame Rate ×100 value describes the intended frame period: framePeriodUs = 100000000 / storedRate100. A value of 2500 means 25 fps, or 40,000 microseconds per frame. This is the total target frame period, not an extra delay to add after reading and drawing. A renderer must account for that work when scheduling frames. The bDelayUs argument of TftRgbFromSdRawAlias() is only a Byte-sized added delay (0–255 microseconds); do not pass 40,000 to it. If the stored rate is 0, it is unknown and this division cannot be used.
An alias or original name that's too long for its field (39 characters), or that repeats one already used by a live file, is shortened to fit and given a 4-digit serial number: the first (limit − 4) characters, followed by 0001, 0002, and so on until the result is unique. A name that already fits and isn't a duplicate is stored exactly as typed. The Alias and Original Name fields are handled independently. When appending, names of live files already on the card are taken into account too; names left behind in free slots are not, since those files are gone.
|
Input |
Stored as |
Why |
|
Bird |
Bird |
Fits, no conflict - stored as-is. |
|
Bird (again, later in the same batch) |
Bird0001 |
Fits, but Bird is already used. |
|
A 45-character name |
First 35 characters + 0001 |
Too long for the 39-character field on its own. |
16384 slots per card, free ones included - a free slot still owns its space until it's reused. Convert & Write and Convert & Append check the batch against the most space that could be available (the untouched space after the last slot plus every free slot's capacity) and the number of slots left before they start. Whether a given file actually fits a particular free slot is decided file by file as the batch runs.
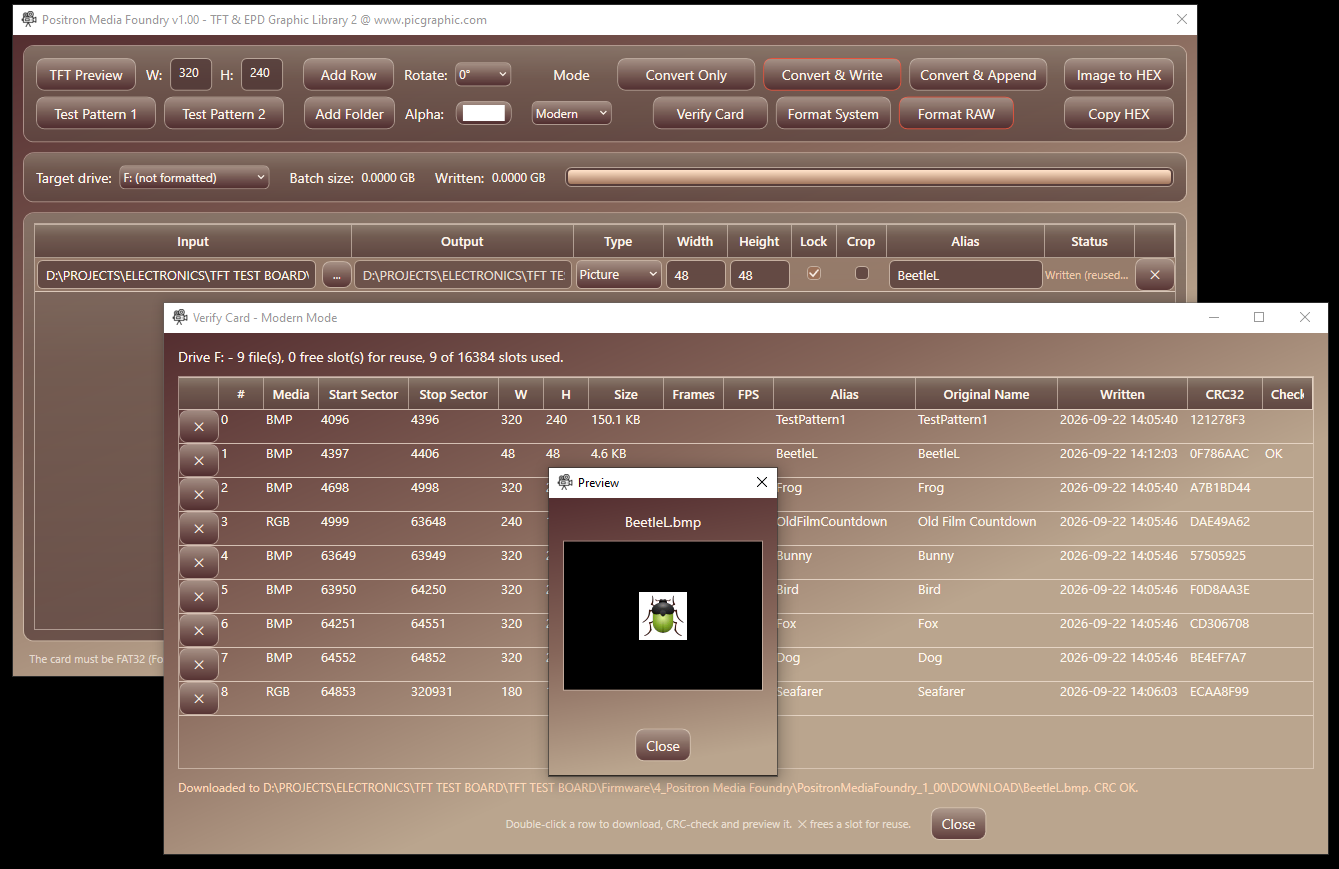
A smaller replacement occupies a freed slot while the allocation retains its original capacity.
After a successful Convert & Write or Convert & Append, the application writes a dated report in REPORTS and opens it. The report contains $define lines and matching display calls. This sector-addressed method is available in both modes, but the numbers depend on the actual card. The illustrative report below is a Legacy-mode example: its first file starts at sector 8. Modern media begins at sector 4096. Always use the report generated for your own card.
$define Bird 8 '0,480,320,8,608,Bird.jpg
$define Cat 609 '1,480,320,609,1209,Cat.jpg
$define Counter 320,240,1210,118509 '2,320,240,1210,118509,Old Film Countdown.mp4
$define Dog 118510 '3,480,320,118510,119110,Dog.jpg
TftBmpFromSdRaw(wX_Pos,wY_Pos,Bird)
TftBmpFromSdRaw(wX_Pos,wY_Pos,Cat)
TftRgbFromSdRaw(wX_Pos,wY_Pos,Counter,wFrameDelayUs)
TftBmpFromSdRaw(wX_Pos,wY_Pos,Dog)
Each $define is a preprocessor alias: wherever Bird appears in your listing, it's replaced with the value beside it. The commented-out text at the end of each line is a record of how that value was built — sequence number, width, height, start sector, end sector, and the original file name — for your own reference; it isn't read by the compiler. In Modern mode, the alias and name in this file are whatever was actually stored on the card (see the previous chapter) - truncated or serial-numbered if the original was too long or repeated.
These $define lines have to appear before any command that uses them. TftBmpFromSdRaw and TftRgbFromSdRaw themselves are part of the TFT & EPD Graphic Library 2 — see its manual for their full parameter list and timing behavior.
The alias procedures read the stored file information, so this form does not need the report's sector numbers. Use the aliases actually recorded on the card; long or repeated names may have been changed. The example assumes the project's setup routines, library and configured TFT hardware are available.
Main:
Clear
SetCrystal()
SetPins()
TftSetUp(0,0)
TftResetScreen(WHITE)
TftBmpFromSdRawAlias("BeetleL",136,96)
DelayMS 2000
TftBmpFromSdRawAlias("TestPattern1",0,0)
DelayMS 2000
TftBmpFromSdRawAlias("Frog",0,0)
DelayMS 2000
TftBmpFromSdRawAlias("Fox",0,0)
DelayMS 2000
TftBmpFromSdRawAlias("Bunny",0,0)
DelayMS 2000
TftRgbFromSdRawAlias("OldFilmCountdown",40,40,0)
TftBmpFromSdRawAlias("Bird",0,0)
End
The movie call's last argument is an added delay in microseconds. Zero means no added delay; actual playback still takes time to read and draw each frame. See Modern Mode Explained for the distinction between stored frame rate and playback timing.
Not every image is worth a trip to an SD card — a small fixed icon or splash screen is often simpler to compile straight into your PIC's program memory. Image to HEX does that: it converts every picture row (video rows are skipped — there's no equivalent flash format for a frame sequence), the same way Convert Only does, and writes a Positron Flash16 declaration for each one into the TEMP folder.
Dim Bird As Flash16 = 480,320,0x0000,0x18E3,0x2965,...
The first two values are the image's width and height in decimal; everything after that is one RGB565 pixel per 0xRRRR entry, row by row. This is the same structure Positron8 and Positron16 expect from a Flash16 table.
Once the run finishes, a read-only preview window — in the app's own theme — shows every declaration generated, selectable and copyable by hand. If any row failed, a summary names which ones; hover that row's Status in the grid for the actual reason.
The Copy HEX button (in that window, or in the toolbar) copies every declaration from the most recent run to the clipboard as a single block, ready to paste into a $Include file.
TFT Preview shows a row's already-converted output positioned on a panel-sized canvas — it does not convert anything itself. Run Convert Only first; if the selected row hasn't been converted yet, Preview tells you so instead of opening.
The W:/H: boxes next to the TFT Preview button (default 320×240) describe your actual panel's resolution — independent of any one row's own Width/Height, which might be smaller (an icon) or larger (a crop) than the panel itself.
The image is centered on the panel by default. If it's larger than the panel in either dimension, the parts that fall outside the panel's bounds are still shown — tinted with a translucent red overlay rather than clipped — so you can see exactly what would hang off the edge of the real display.
Inside the preview window, a second pair of W:/H: fields lets you reposition the image instead of leaving it centered: they give the position of the image's bottom-left corner, measured from the panel's own bottom-left origin — matching the library's own coordinate convention, (0,0) at bottom-left, +X right, +Y up. Changing either field updates the preview immediately.
◀ and ▶ step to the previous/next eligible row in the batch without closing the window — useful for flipping through a whole batch's conversions one after another. A row that hasn't been converted yet shows a message instead of an image when you navigate to it.
A video row plays back its raw RGB565 frame stream at a fixed 25 FPS, decoded live in the preview window — Preview covers both pictures and video now, not pictures only.
Verify Card reads back the index already on the selected drive and shows what's recorded there. Listing and previewing never write to the card; the only thing that does is freeing a slot in Modern mode, and only after you confirm it. What it looks like depends on the Mode the card was written in.
A text summary: file count, and each one's sector range and size.
What it can't show
File names and aliases aren't stored on the card itself in Legacy mode, only in the matching REPORTS file from whenever that data was written — Verify Card can only show sector ranges and sizes, numbered in write order.
An interactive window listing every slot in the file table: slot number, media type, start and stop sector, width, height, size, frame count and frame rate (video), alias, original name, the date and time it was written, its CRC32, and the result of its last CRC check. The summary line above the list counts live files, free slots, and slots used out of 16384. The list is read-only.
Double-click a row to download that one file into the DOWNLOAD folder next to the executable, check it, and open it in a preview window, played back with ffplay.exe (see Requirements). A picture opens directly; a video uses the width and height stored in its own table entry, so it always decodes the raw RGB565 stream correctly. Only the file's exact Data Length is saved - no sector padding.
CRC check. While downloading, the app computes the CRC32 of the bytes it reads back and compares it with the CRC32 recorded when the file was written. The Check column then shows OK, or FAIL in red with a warning explaining that the data on the card no longer matches what was written. The file is still previewed after a failure, so you can see the damage.
Freeing a slot. The × button marks the selected slot free after confirmation. Only its Media Type byte changes. The data and allocated range remain until reused, and the row stays visible but dimmed. Convert & Append can put a new file in that allocation if it fits. A saved sector-based $define can then point at different media; an alias for the deleted file is no longer a live entry. Check your firmware references when replacing media.
The preview window
ffplay's own display is embedded inside the app's themed preview window rather than opening as a separate window. If that embedding doesn't happen for some reason (an unusual display driver, an ffplay update that changes its startup timing), ffplay still plays the file — just in its own ordinary window instead of inside the app's.
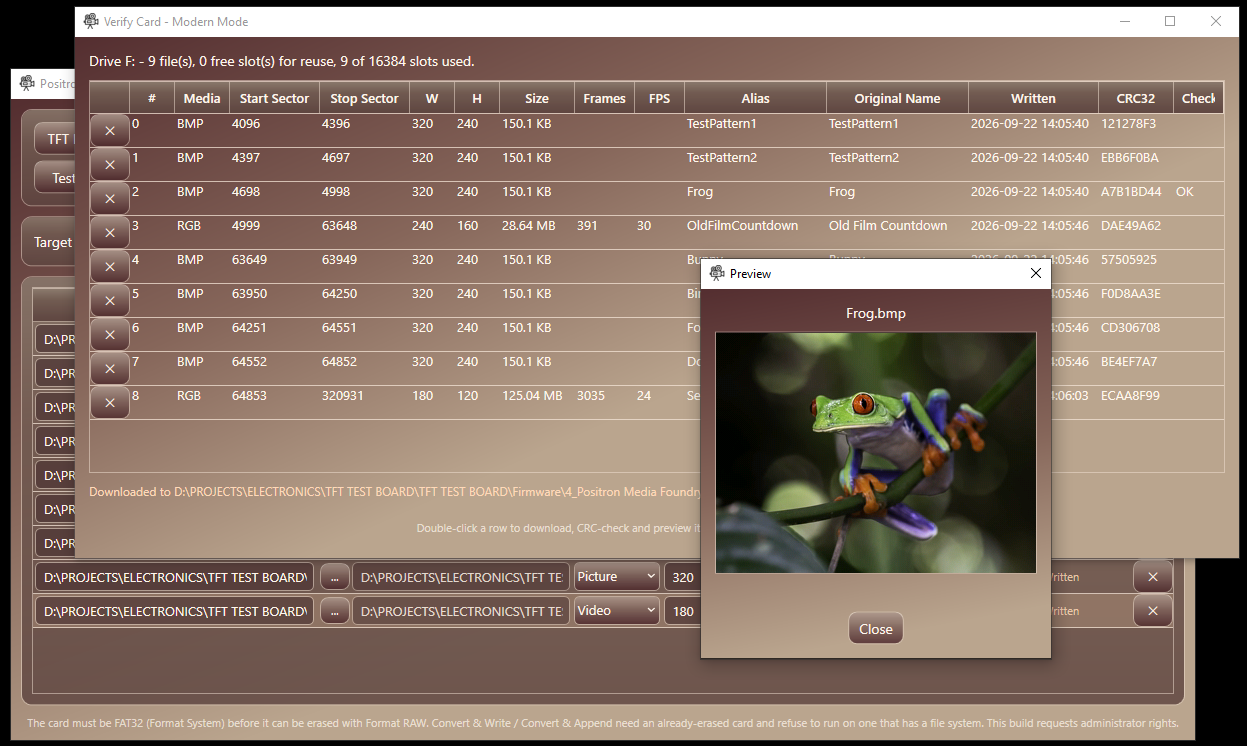
A file read back from the card is checked and previewed.

Freeing a Modern slot requires confirmation.
The freed slot stays in the list, retaining its allocated sector range.
Two toolbar buttons, next to Verify Card, manage the card's file system directly. Both work the same way regardless of which index Mode you'll write afterward.
Opens the standard Windows Format dialog for the selected drive — the same one you'd get right-clicking the drive in Explorer and choosing Format. Choose FAT32 there.
Destructive
Erases every sector on the card, starting from 0, outside the normal Windows file system. There's no undo, and it can take a while on a large card.
This app's own erase, entirely separate from Windows formatting: it zeroes every sector directly, with its own progress bar and the Written field (in the drive strip) showing how much has been erased so far. Format RAW requires the card to currently be FAT32 — it'll tell you to run Format System first if it isn't. Once it finishes, the card has no recognized file system at all, which is exactly the state Convert & Write and Convert & Append require before they'll run, in either Mode.
Convert & Write and Convert & Append refuse to run on a card that still shows a recognized file system — they need an already-erased one, and will point you back here if the selected drive isn't. The intended sequence for a card fresh out of the packet, or one you want to wipe clean (or switch to the other index Mode), is:
After the first successful write, Convert & Append adds to that same card in the same mode without either formatting step. To rebuild the card from scratch, repeat the full three-step sequence above. Do not format a card when you only intend to append to its existing index.
Format RAW asks for confirmation before erasing the selected card.
Two toolbar buttons add a row pointing at a generated master image instead of a real file, for testing without an actual asset on hand. Each is drawn directly at the panel W:/H: boxes' current size (next to TFT Preview) — not a fixed size that then needs cropping or scaling down — so the row's Width/Height are set to match exactly and Convert Only's resize step is a no-op. Regenerated fresh every time the button is clicked, at whatever the panel size currently is, so a newer build's pattern (or a changed panel size) always replaces whatever was there before rather than leaving a stale file behind. From there each goes through the normal pipeline like any other picture row.
A classic NTSC/SMPTE-style color bar card, in the usual three tiers: the main seven bars (white, yellow, cyan, green, magenta, red, blue) on top, a thinner reversed-order strip beneath them, and a simplified PLUGE reference strip at the bottom — the small near-black calibration patches broadcasters use to set a display's black level. Not calibrated to real IRE levels; this is for spotting a wrong crop, flip, or rotation at a glance, not for calibrating a monitor.
A simplified nod to the classic PAL test cards (Philips PM5544 and its relatives): a centered circle with a crosshair, four colored reference patches at its cardinal points, and a grayscale step wedge along the bottom. Deliberately pared back from a real PM5544, which also carries frequency gratings, a full color-bar block, and on-screen text — this keeps just the circle/grid-and-patches character with far fewer elements. The circle stays a true circle (not stretched into an ellipse) regardless of the panel's own aspect ratio.
Hover the row's Status cell — the tooltip carries ffmpeg's actual error text, not just the word "Failed". That's usually enough to tell what went wrong (a bad crop size, a corrupt source file, and so on) without guessing.
The earlier raw-write problem could involve Windows retaining access to the card while a direct write was underway. Media Foundry locks and dismounts the volume before writing and provides the Format System/Format RAW preparation steps. The old manual MBR-editing workaround is not required for this normal workflow. If a write still fails, check the following:
Format RAW needs the card to currently be FAT32 to start at all — run Format System first if it refuses outright. If it fails partway through the erase itself, retry once; a card reader can occasionally need a moment to keep up with a long run of large sequential writes.
Confirm the app is running elevated (it should prompt for this automatically on launch) and that the correct drive letter is selected — the dropdown shows each removable drive's volume label and size to help tell them apart if more than one is plugged in.
ffmpeg.exe and ffprobe.exe need to sit in the same folder as the application itself. The app warns about this on launch if they're missing, but the same warning applies if the check was skipped or the files were later removed.
Append needs an index already on the card, in the same Mode that's currently selected - only Convert & Write creates one. Run that first on a freshly Format RAW'd card, use Verify Card to confirm what's actually there, or check that the Mode dropdown matches how the card was originally written.
They need a card with no recognized file system — see Formatting a card. If the warning names a file system (FAT32, exFAT, NTFS...), that card hasn't been through Format RAW yet.
A FAIL result means that the bytes read back do not match the stored CRC32. It identifies an integrity mismatch, not its cause. Rewrite the file and check again; trying another card reader can help distinguish a reader or connection problem from a card problem. To replace one Modern-mode file, free its slot and use Convert & Append, or rebuild the card if necessary.
The Modern table changed during development, including its slot size, slot count and field positions. An incompatible development card must be rebuilt with the current format: Format System (FAT32) → Format RAW → Convert & Write. Rebuilding replaces its contents.
The table has 16,384 slots, including free ones. A new slot also needs unused card space after the last allocation. A free slot is useful only if its allocated sector range is large enough for the incoming file; several small free areas do not form one larger slot. Reduce the batch, free a suitable slot, or rebuild the card using the full preparation sequence in Formatting a card.
Confirm ffplay.exe is in the same folder as ffmpeg.exe and ffprobe.exe — it's the one executable of the three that's only needed for this one feature, so it's easy to have left out. If the file downloaded to DOWNLOAD but nothing plays, try opening it directly with ffplay from a command prompt to see whether ffplay itself reports an error with that specific file.
Preview only displays a row's already-converted output; it doesn't convert anything itself. Click Convert Only, then Preview.
See Background color — this is expected once you know RGB565 has no alpha channel: every partially transparent pixel is blended against whatever color the swatch is set to, and a different choice there will change the result.
Modern, unless you have firmware that already expects Legacy's index. Modern stores everything needed to identify, play back and integrity-check each file on the card itself, and lets you free and reuse individual slots. Legacy remains available unchanged for existing cards and firmware.
In Modern mode, yes: the ✕ button in Verify Card frees its slot. Its space is reused by the next Convert & Append that has a file of the same size or smaller. Legacy mode has no way to delete individual files.
The index formats cannot be changed in place. Prepare the card again with Format System (FAT32), then Format RAW, and finally Convert & Write in the new mode. This replaces the existing contents.
Yes — each row has its own Type, and the two are converted and written using different pipelines automatically.
No — the output is always exactly the row's Width × Height either way. Crop only changes how the source gets there: cropped symmetrically from the center to preserve its proportions first, or simply stretched to fit if unchecked.
No — see TFT Preview. It only shows what's already in the row's TEMP output; run Convert Only first.
It shows the volume label and size alongside the letter, the same way Explorer does, so it's easier to confirm you've picked the right card when more than one removable drive is plugged in.
Legacy mode reads and appends to it without any special handling — the index format is unchanged from earlier versions, and so is the "data starts at sector 8" convention.
Yes, as long as Windows lists it as a removable drive — that's the only filter the drive list applies.
Most batches target one panel at a time, so one orientation setting covers the common case with one control. If you need mixed rotations in a single session, run the differently rotated rows as separate batches.
|
Version |
Changes |
|
1.00 |
Current release. TFT-only RGB565 pipeline (no EPD output).
|
Positron Media Foundry · Modern Mode Explained · RAW / No file system
Created with the Personal Edition of HelpNDoc: Converting Word Docs to eBooks Made Easy with HelpNDoc