User Manual
… visits


PositronPixelFoundry overview | Compression Explained
Positron Pixel Foundry prepares pictures for two- and three-color e-paper displays and converts the result into a Positron BASIC Flash8 table. It supports BW (black and white), BWR (black, white and red), and BWY (black, white and yellow) panels.
You can size the picture, adjust its appearance, compare the original with the processed result, save a bitmap, and generate compact image data for your display code. The preview represents the selected output palette; an actual panel may look different because of its pigments, lighting and display settings.
The default transparency/padding background is black. CLAHE and Edge Preservation are enabled when a new image is loaded. Both thresholds start at 50%; the other sliders start at 0, and dithering and isolated-pixel cleanup are off. A loaded settings profile or an applied preset can replace these defaults.
The interface is arranged around the same sequence used by the conversion pipeline: load the source, define the target panel and geometry, tune image preparation, classify and dither the result, inspect the preview, then save the BMP or generate compressed HEX data.
The cropped views below are taken from the main application window so that each control group can be read next to the section that explains it. The separate preview window is covered later under Preview and orientation.

Input, Output, Open image, Save BMP and Preview controls
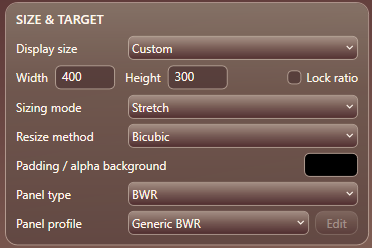
Size & Target controls: display dimensions, sizing mode, resize method, background, panel type and profile
Open image accepts the image formats supported by the supplied FFmpeg tools. Loading a new image closes the previous preview, resets image adjustments and orientation, and sets Width and Height to the source dimensions. Panel preferences and processing priorities are retained. Choose the required output dimensions after opening the image.
Input
shows the full source path.
Output
shows the proposed bitmap path and is updated to the actual destination after Save BMP. Long paths may extend beyond the visible text box; the field still contains the complete path.
These controls set the output dimensions in pixels. Choose dimensions that match your panel or the part of the panel where the image will be drawn.
The display-size menu includes 176 × 264, 152 × 296, 128 × 296, 200 × 200, 152 × 152, and 240 × 416, alongside the existing sizes such as 296 × 128, 400 × 300, 800 × 480 and 800 × 600. Width comes first: 128 × 296 and 296 × 128 are different orientations. Select Custom or edit the dimensions for another size.
Lock ratio keeps the current width-to-height proportion when you edit either dimension. It locks the dimensions currently shown, not necessarily the original picture's proportions. Selecting a display-size preset establishes a new ratio.
Once a preview has been prepared, valid size changes refresh it automatically after a short pause. You do not need to press Preview after every edit.
Sizing Mode replaces the former Crop checkbox.
|
Mode |
What it does |
When it is useful |
|
Stretch |
Fits the whole picture to exactly the requested width and height. Different proportions can make objects wider or taller. |
Artwork already shaped for the target, or when distortion is acceptable. |
|
Fit |
Preserves proportions and keeps the entire picture. Empty space is filled with the selected background color. |
Pictures whose edges must not be lost. |
|
Fill / crop |
Preserves proportions, enlarges or reduces the image to cover the target, then crops centrally. |
Filling the display without borders or stretched objects. |
|
Original size |
Uses the source dimensions after orientation, without resizing. |
Images already prepared at the required pixel size. |
Original Size disables manual dimensions, ratio lock and Resize Method. It does not disable image adjustments or color classification. Choosing a display-size preset while in Original Size switches sizing to Fit.
This selects how FFmpeg calculates pixels when the picture changes size. It affects resizing, not the preview's zoom level.
|
Method |
Effect |
|
Nearest neighbour |
Keeps hard pixel edges without smoothing. Useful for pixel art and already pixel-aligned graphics. |
|
Bilinear |
Smooths transitions with a relatively soft result. |
|
Bicubic |
Provides a balance between smoothness and detail. |
|
Lanczos |
Retains fine detail, but can introduce faint light or dark fringes around strong edges. |
|
Area |
Averages source detail when reducing an image. |
When the oriented source already has the requested dimensions, the program skips the explicit resize filter. Color-format and transparency preparation may still be required.
Click the color swatch to choose the background. It serves two purposes: filling unused space in Fit mode and replacing transparency in source images such as PNG files. The default is black.
Partly transparent pixels blend with this color before resizing, so the choice also affects soft transparent edges. Choose white for a white page or logo background, for example. This is an input background, not a guaranteed final panel color: it passes through the adjustments and final color decision along with the picture.
Panel type determines the available output colors: BW, BWR or BWY.
Generic BW, Generic BWR and Generic BWY panel profiles use ideal black, white and, where applicable, red or yellow. Selecting a generic profile also selects its panel type.
With Custom, use the profile editor to choose approximate panel black, white and accent colors. The white color must be lighter than the black color. These choices affect color matching, the preview and BMP export. They do not add more physical colors or change the meaning of the exported display bits. Custom colors approximate a panel's appearance; they are not an automatic hardware calibration.
Do not confuse a Panel Profile with a starting image preset: the former describes the available colors; the latter is a recipe for adjusting the picture.
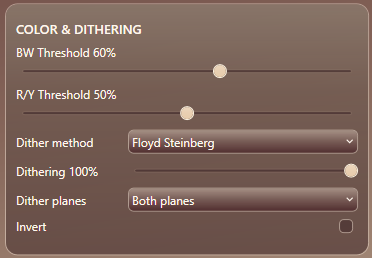
After the image adjustments, the program compares each pixel with the available panel colors and makes one joint decision. It does not assign red/yellow first and then process the remaining pixels as black/white.
The comparison uses Oklab, a color model that separates perceived lightness from color differences. The scoring gives extra importance to color differences to help avoid assigning an accent color to neutral areas. The two threshold sliders bias this shared decision. They are not separate stages and have no processing priorities of their own.
When dithering is enabled, the decision also takes the selected pattern or neighboring pixels' color errors into account. The output still contains only the panel's available color choices.
This controls the preference between black and white:
These choices use the panel profile's black and white colors. A threshold of 50 is not simply a test of whether each RGB channel is above or below 128.
This controls how readily the accent color wins against black and white:
The control has no effect in BW mode. In BWR/BWY, either threshold can change all three pixel counts because the colors compete in the same decision.
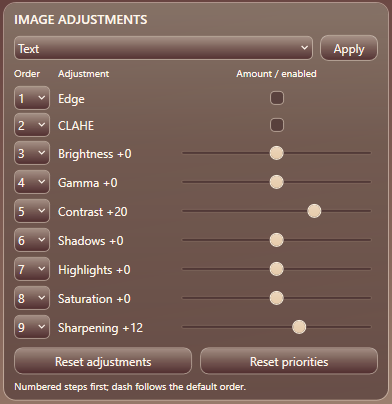
Image Adjustments group with ordered processing stages and adjustment controls
These controls prepare the picture before reducing it to the panel palette. Changes are made from retained source/stage data, not by repeatedly modifying the already-classified preview.
Reduces small color and brightness variations while trying to preserve real boundaries. It is useful for noisy photographs and compressed images. Applied before sharpening, it can prevent noise from being emphasized along with genuine detail.
Unticking Edge skips the operation but keeps its priority number reserved.
Improves contrast locally, in different parts of the picture. Unlike global Contrast, it can treat a dark subject and a bright background differently. It is useful for uneven lighting and is enabled by default.
It can also reveal noise or make flat artwork look busy. Compare enabled and disabled results, especially with text and logos. Unticking it skips the operation without releasing its priority number.
Moves the whole image lighter or darker. It affects shadows, middle tones and highlights together. Strong changes can turn several different shades into the same black or white value, losing detail.
Reshapes mainly the middle tones while keeping pure black and pure white at their endpoints. In this application, positive values darken middle tones; negative values brighten them. Use it when the endpoints look right but faces or middle-tone details disappear.
Positive values separate dark and light areas more strongly; negative values bring them closer together. Too much contrast removes subtle detail before the thresholds or dithering can use it.
Targets darker parts of the image more strongly than bright parts. Positive values lift shadows; negative values deepen them. Try it when a dark face or object becomes a solid black area while the rest of the image looks acceptable.
Targets brighter parts more strongly than dark parts. Positive values brighten highlights; negative values reduce them. Reducing highlights can help retain detail in light clothing, clouds or pale backgrounds.
Shadows and Highlights are gentle brightness-weighted adjustments, not tools that reconstruct missing detail. Completely clipped source areas cannot be recovered.
Changes color intensity. Negative values move colors toward gray; positive values strengthen them. This can change how much of a BWR/BWY image becomes red or yellow.
At −50, the input to the following stage is fully desaturated. At 0, saturation is unchanged.
Positive values emphasize boundaries and fine details; negative values blur them. A small amount can help compact display graphics. Excessive sharpening can create halos or isolated dots after classification.
Reverses the adjusted RGB colors after the nine ordered adjustments and before classification. It is not a simple swap of the final black and white display bits, so it can also affect accent-color selection.
The nine priority menus determine the order of the adjustment stages. Lower numbers run first. The default sequence is:
Order matters because every operation receives the preceding operation's result. Sharpening before smoothing is different from smoothing before sharpening. CLAHE also builds its local corrections from the image at its current position in the chain.
Each number can belong to only one stage. A menu offers its current number and the numbers that are free. To exchange occupied numbers, temporarily set one stage to dash, assign its released number to the other stage, then assign the remaining number.
A dash means no explicit priority, not disabled. Numbered stages run first in ascending order; dashed stages follow in the default order above. Gaps are allowed: 1, 2, 3, 6 and 8 run in that order. If all menus show dashes, the complete default order is used.
An unticked Edge or CLAHE stage does nothing even if it has a number. Its number remains reserved. Neutral slider values likewise leave that operation without an image-changing effect.
Reset Priority sets all nine menus to dash. It does not change sliders or checkboxes.
Reset Controls returns both thresholds to 50% and all other sliders, including Shadows, Highlights and Dithering Strength, to zero. It does not reset priorities, checkboxes, sizing choices, the selected dither method or cleanup menus. Use it as a slider reset, not a complete factory reset.
The source is oriented first. Transparency is composited onto the selected background, then the image is sized and padded or cropped as required. The nine adjustments run next, followed by Invert, joint classification with the selected dithering, and final isolated-pixel cleanup. The resulting planes supply the preview, pixel counts, BMP export and compressed HEX data.
Compression changes how the result is stored, not what the image looks like. Preview zoom is also separate from processing and never changes exported dimensions.
|
Color & Dithering group with thresholds, method, strength and plane selection |
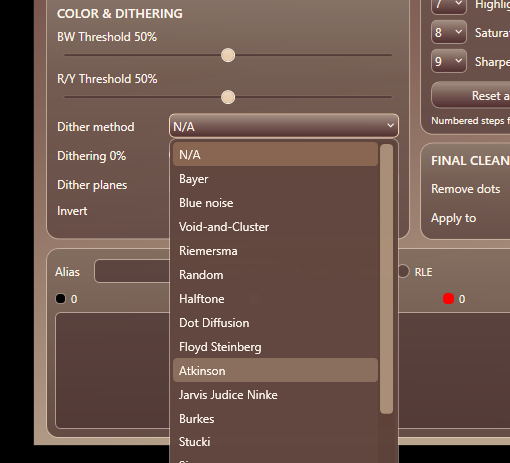
Available dithering methods in the Dither method menu |
A panel pixel cannot display a smooth gray shade. Dithering arranges the available colors into small patterns that suggest intermediate shades when viewed together. It can preserve photographic detail, but it can also make a clean logo look unnecessarily dotted.
At 0% strength, dithering is disabled regardless of the method. Increasing strength increases its influence, but the slider is calibrated differently for different methods. A setting of 75% is not an identical mathematical strength in every algorithm. Maximum strength is not necessarily the best image.
The Random method uses a fixed seed, so unchanged input and settings do not produce a new random pattern on every refresh.
This menu applies to BWR and BWY panels and is inactive for BW. The accent plane means red on BWR and yellow on BWY.
|
Selection |
Behavior |
|
Both planes |
Uses the selected dither with the joint color decision. |
|
Black / white only |
Keeps the undithered accent mask fixed and dithers the remaining black/white image. |
|
Accent only |
Lets dithering affect accent selection. Wherever accent is not selected, it retains the undithered black/white choice. |
For example, Black / white only can retain a clean red logo while dithering a photographic background. These restrictions apply during classification; final cleanup can still change pixels afterward.
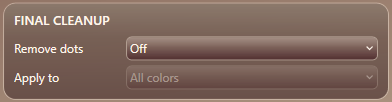
Final Cleanup controls
This operates after dithering and classification. It can remove scattered specks that distract from an otherwise clean image.
A pixel changes only when an allowed replacement color has a majority among its available immediate neighbors. Cleanup uses one snapshot-based pass: changing one pixel does not trigger a chain of further changes in the same pass.
Cleanup target limits the changes:
Use cleanup cautiously with small text, punctuation, thin lines and pixel art. A deliberate dot or a useful dither pattern can look like noise to the cleanup operation. Compare at an enlarged zoom and keep Off when those details matter.
Choose a preset and click Apply. Selecting the name alone does not apply it.
|
Preset |
Starting approach |
|
Photograph |
Lanczos resizing, Floyd Steinberg dithering and moderate tonal/detail adjustments. |
|
Portrait |
Similar to Photograph, with gentler contrast and sharpening and more shadow lifting. |
|
Text |
Bicubic resizing, stronger contrast and sharpening, a darker BW threshold, and no dithering. |
|
Line Art |
Bicubic resizing with moderate contrast and sharpening and no dithering. |
|
Pixel Art |
Nearest-neighbour resizing, neutral sliders and no dithering. |
Presets replace current adjustment values, restore the numbered default order, turn off Invert, Edge and CLAHE, and disable cleanup before applying their recipe. They retain the panel type, dimensions and orientation. Custom applies no recipe; it is not a saved copy of your previous settings.
Treat presets as starting points, then tune the image. Save a profile before applying one if you want to retain your existing setup.

Preview toolbar: zoom, rotation, flips, X/Y swap and view mode
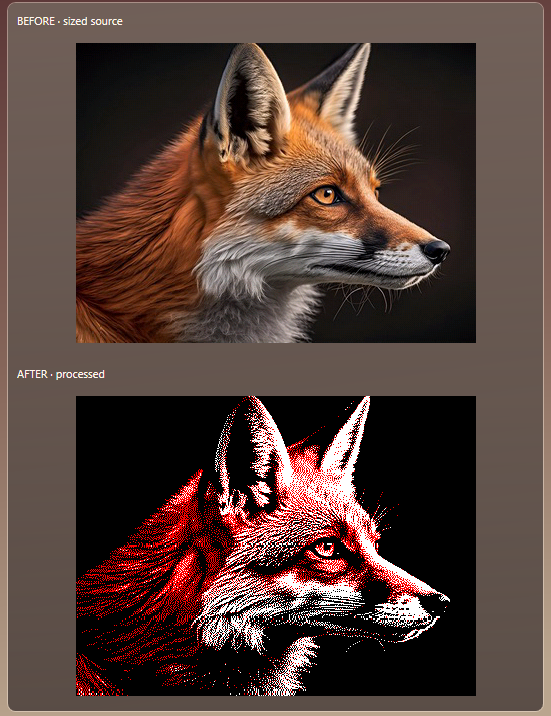
Before / After comparison in the preview window
Preview prepares the current result and opens the preview window. Subsequent processing changes update it automatically. The separate preview window can be narrowed to fit the zoom and orientation toolbar, with padding after Swap X/Y.
Before is therefore the prepared source, not the untouched full-resolution original. Both panes remain inside the window and scroll when needed; a large image does not force the window to expand. The prepared source uses RGB565 precision, so Before is not a full-color-precision reference for the original file.
Use 1x, 2x, 3x or 4x. Enlarged views make individual pixels easier to inspect. At 1x, inspect the overall pattern without extra application magnification. Its physical size on your monitor is not necessarily the physical size on the e-paper panel.
The orientation buttons sit beside the zoom buttons:
These operations are applied to the source before sizing and processing, not just to the already-classified preview. They affect Before and After, BMP and HEX output, and are saved in settings profiles.
The program keeps intermediate images and reusable calculations in RAM. If the fifth adjustment changes, it reuses the output of the fourth and recalculates only the affected stages afterward. Changing priorities restarts at the first changed position in the actual order.
Threshold and dither changes reuse the adjusted RGB image. Cleanup-only changes reuse the classified planes. The Before bitmap is rebuilt only when source preparation changes; zoom and comparison-view changes only affect display. Pressing Preview with unchanged settings reuses the processed result, while still checking the source file.
Compression figures are cached and refreshed after the image update when necessary; a brief … indicates pending figures. Caching does not intentionally reduce processing quality. Early-stage changes, large Original Size images and expensive dithering can still take longer because their dependent calculations genuinely need to run again.
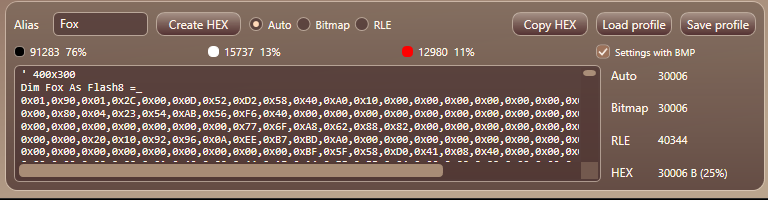
Pixel counts, Alias, HEX output, compression selection, profile controls and size statistics
The black, white and accent figures show the number and percentage of final pixels assigned to each choice, after cleanup. Rounded percentages total 100%.
Beside the HEX output box, four evenly spaced rows show:
All byte counts include the four-byte dimensions header and both plane mode markers. They describe the binary table data, not the size of the text file containing the declaration.
The displayed percentage is data bytes ÷ total pixels × 100. For example, 10,000 bytes for 40,000 pixels is 25%. It is not the percentage saved against the source file, BMP file or an uncompressed two-plane bitmap.
Statistics remain available after the preview window closes. Processing changes clear generated HEX text when the pixel result is rebuilt; click Create HEX again when you need an updated table.
The format stores two one-bit planes: black/white and accent. BW images retain an empty accent plane so the format stays consistent. Each plane is encoded independently.
Compression does not alter the pixels. Auto is a practical default because the best encoding can differ between the two planes.
The table starts with width high byte, width low byte, height high byte and height low byte. The BW plane's mode and data follow, then the accent plane's mode and data.
|
Mode byte |
Meaning |
|
0x00 |
Bitmap data |
|
0x01 |
RLE data |
|
0x02 |
All-zero plane; no following pixel data for that plane |
|
0x03 |
All-one plane; no following pixel data for that plane |
In the BW plane, 0 selects black and 1 selects non-black. In the accent plane, 1 selects red/yellow and 0 means no accent. Accent pixels have BW=1 and accent=1. Bitmap bits are MSB-first from left to right; export reverses the internal top-to-bottom rows for the bottom-up ordering expected by the Positron routines.
RLE stores a starting value byte, then run lengths. A long run uses 255, 0 pairs before its remaining length, allowing the same value to continue. There is no terminator; decoding stops after width × height pixels. Use the decoder for this format rather than a generic BMP-RLE decoder.
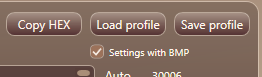
Copy HEX, Load profile, Save profile and Settings with BMP controls
Save profile writes an INI file containing dimensions, sizing and resize choices, background color, panel type/profile and custom colors, sliders, checkboxes, dithering, cleanup, all nine priorities, orientation, compression selection and Alias.
A normal profile is a reusable recipe and does not include the source image or its path. Load profile applies it to the current source and refreshes the result. Check the dimensions and orientation when applying a profile to a different picture.
Older INI files can still be loaded. Missing Shadows/Highlights and cleanup settings receive neutral defaults, and missing priorities use the fallback order. Older classifier versions may produce different results. Saved values also override current defaults: an older profile can restore a white background or disable CLAHE.
Save BMP prepares the current result if necessary and saves an RGB565 bitmap at the output pixel dimensions. The preview window does not have to be open. Saving over the source image is blocked to protect the original.
Custom panel colors are rounded to RGB565 precision in the bitmap, so displayed RGB colors can differ slightly from their saved equivalents.
Enable Settings with BMP, below Load Profile, to save a companion settings file. For example, MyPicture.bmp is accompanied by MyPicture.bmp.ini. The settings are beside the BMP, not embedded inside it.
This file contains the processing settings and orientation, the original source path and a source fingerprint, plus an output fingerprint. Keep the original source as well as the BMP and INI if you want to reproduce the conversion later.
To reproduce it, use Load profile and select the .bmp.ini. If the saved source is available and its fingerprint matches, the program opens it and applies the settings. If the source is missing, changed or cannot be opened, a warning explains that the settings will instead be applied to the currently loaded image. Loading continues without asking you to locate the old source. If no image is loaded, the settings still load, but no preview is generated. To apply them to another picture, open that picture first, then load the profile.
Applying the recipe to a different image will not reproduce the original BMP. For matching results, use the unchanged source and the same compatible processing/FFmpeg version—settings files do not bundle the application itself.
If Settings with BMP is off, saving does not update an existing companion INI. A warning identifies that situation; the old settings may no longer describe the newly saved bitmap.
Create HEX generates the Positron BASIC table from the current processed planes, preparing the image first if necessary. The text appears in the large output box and is saved as a .txt file in the application's TEMP subfolder. Copy HEX copies the displayed text.
Alias supplies the variable name, for example:
Dim MyPicture As Flash8 =
Use a valid Positron identifier without spaces or unsupported punctuation. Copying or creating HEX does not itself save a BMP.
Judge the final result without extra zoom as well as enlarged, and test it on the actual panel before settling on a reusable profile.
Created with the Personal Edition of HelpNDoc: Easy EPub and documentation editor