BDF.inc

BDF.inc file include the following user oriented procedures:
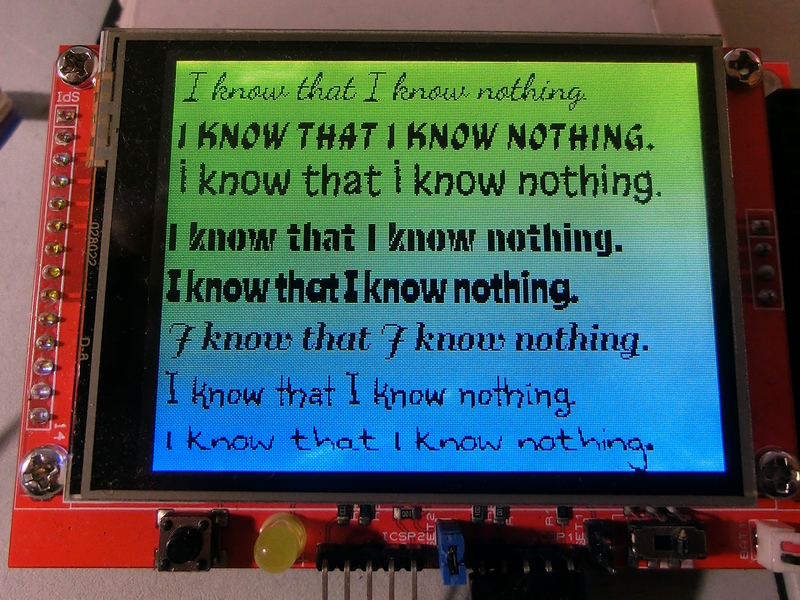
BDF (Bitmap Distribution Format) fonts, developed by Adobe, are a type of bitmap font where each character is represented by a specific set of pixels. Although they are not widely available on the internet, they can easily be generated from any TTF (TrueType) font using tools like FontForge and the Bdf_To_Flash tool.
Since BDF fonts have varying sizes for different glyphs, scaling them up can be challenging. As a result, if you need fonts in different sizes, you'll have to generate separate sets for each size. The TFT Graphic Library allows you to include up to 9 different BDF fonts.
A key characteristic of BDF fonts is their uneven glyph sizes and printing offsets. As such, when using the TFT Graphic Library, you can only print strings, numbers, and characters at absolute position coordinates. You cannot predict the exact space a string will take, but you can determine the maximum possible space required.
With absolute coordinate printing, if your screen is 320x240 pixels, for example, starting the print at coordinates (5, 10) will place the lower-left corner of the first glyph at position x=5, y=10.
This font format supports transparent printing, where only the active pixels are printed, preserving the background. However, due to the lack of a full-screen graphic memory buffer, once the background is overwritten by glyph pixels, it cannot be restored. Transparent printing is slower than using a background color because of the extra processing required. If transparency is enabled, the background color (wBackColor) will be ignored, and only the glyph’s pixels will be printed.
To use a specific BDF font, include the corresponding BDF font .inc file in your code. Then, select the font using the TftSetBdfFont() command, which should only be called once. If you use multiple BDF fonts, the currently selected font will remain in effect until changed with another TftSetBdfFont() command.
Demo fonts are included in the TftLib\Fonts\BDF folder. Once generated with a particular index, you can modify the font index if needed. To change the font index, open the BDF font file and manually edit the index number for each font property. For example, here’s what the index for font 1 might look like:
|
$define Font1 Symbol BoundingBoxWidth1 = 19 'Font Original: 20 Symbol BoundingBoxHeight1 = 22 'Font Original: 25 Symbol BoundingBoxX1 = -2 'Font Original: -2 Symbol BoundingBoxY1 = -5 'Font Original: -5 Symbol AsciiStartOffset1 = 32 '... Dim BitmapOffset1 As Flash16 Dim Bitmap1 As Flash8 Dim DwidthOffsetX1 As Flash8 Dim DwidthOffsetY1 As Flash8 Dim BbX1 As Flash8 Dim BbY1 As Flash8 Dim BBOffsetX1 As Flash8 Dim BBOffsetY1 As Flash8 |
How to Use the Font Table File
Using FontForge, we can export a .bdf font file with only the selected characters we need, rather than exporting the entire font set. While it’s possible to export a limited set of characters, it’s preferable and much easier if the characters are continuous in the ASCII range. In other words, try to avoid skipping characters; instead, trim the start and end of the font to match the range of characters you need.
For this example, I only want to print digits, so there’s no need to include the full ASCII table. I trimmed the font to include only ASCII characters from 48 (the digit '0') to 57 (the digit '9').
File General Information:
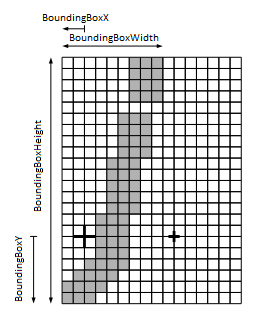
• BoundingBoxWidth: The maximum width (in pixels) that any character can occupy.
• BoundingBoxHeight: The maximum height (in pixels) that any character can occupy.
• BoundingBoxX: The maximum horizontal displacement (offset) in pixels that any character can have.
• BoundingBoxY: The maximum vertical displacement (offset) in pixels that any character can have.
• AsciiStartOffset: The ASCII code of the first character available in the font data tables.
These font bounding box parameters are useful for tasks like adjusting the starting x and y positions when printing text. For example, if you are printing on row 0, these parameters can help avoid printing characters outside the visible screen area. Additionally, they are helpful for calculating the new line position when breaking a printed text into multiple lines.

Overview:
When printing a character from a BDF font, we need to calculate the proper position of the character on the screen using the provided font data tables. Each character has specific properties such as its width, height, and offsets within the bitmap table. These properties are crucial for correctly displaying each character without overlap or distortion.
AsciiStartOffset: This value is used to determine the position of a character in the font table. For example, if you want to print "2" (ASCII code 50), you first subtract 48 from the ASCII value (50 - 48 = 2), which means it is the third character in the table.
Font Tables:
BitmapOffset As Flash16: This table holds the start position (in 16-bit units) for each available character in the bitmap table.
Bitmap As Flash8: This table contains the actual bitmap data for the characters, with each byte representing 8 bits (or pixels).
DwidthOffsetX As Flash8: This value specifies the horizontal offset to move the position for the next character after rendering.
DwidthOffsetY As Flash8: This value specifies the vertical offset to move the position for the next character after rendering.
BbX As Flash8: Bounding box width of a character, used to calculate how many bytes per row are required.
BbY As Flash8: Bounding box height of a character.
BBOffsetX As Flash8: The horizontal offset of the character's bitmap from (0,0).
BBOffsetY As Flash8: The vertical offset of the character's bitmap from (0,0).
Here’s the step-by-step procedure to print a character or string, using the character "2" (ASCII 50) as an example.
Determine Character Index:
For character "2" (ASCII code 50), the index in the font table is:
50 - 48 = 2 This tells us that the character "2" is at index 2 in the font tables.
Get Offsets and Dimensions:
ChOffsetX, ChOffsetY: The horizontal and vertical offsets for the character from the BBOffsetX and BBOffsetY tables.
ChBbX, ChBbY: The bounding box width and height of the character, found in the BbX and BbY tables.
Calculate Position:
Adjust the starting position for the character (X_Pos, Y_Pos) by considering the bounding box size:
X_Pos = X_Pos + Abs(BoundingBoxX) - 1
Y_Pos = Y_Pos + Abs(BoundingBoxY) - 1
This ensures the character fits within the display area and accounts for any displacement in the font.
Set Graphic Memory Window:
Define a window in the graphics memory where the character will be printed:
SetWindow(X_Pos + ChOffsetX, X_Pos + ChOffsetX + ChBbX - 1, Y_Pos + ChOffsetY, Y_Pos + ChOffsetY + ChBbY - 1)
This sets the window to the area of the screen where the character will be rendered.
Calculate and Read Bitmap Data:
Bytes per Row: From the BbX table, get the number of bits per row. If BbX is 11 (in this example), it means each row requires 2 bytes (11 bits).
Bytes to Print: From the BbY table, determine how many rows the character has. For example, if BbY is 19, then the character spans 19 rows.
Bitmap Data: Use the BitmapOffset As Flash16 table to find the start and end positions of the bitmap data for the character. For the character "2", the offset starts at 55 (0x37) and ends at 92 (0x5C).
Render the Character:
The bitmap data is then read and printed left-to-right, top-to-bottom. Each byte represents 8 bits (pixels), where 1 indicates a pixel is set and 0 means it’s cleared.
For each row of pixels, read the corresponding 2 bytes from the Bitmap As Flash8 table. In the case of 11 bits, the extra bits are discarded, and the remaining bits are used to set the pixels.
Example of Character Rendering (Character "2"):
From BitmapOffset table, we get:
Start position: 55 (0x37)
End position: 92 (0x5C)
From Bitmap As Flash8 table, we read the following bytes from positions 55 to 92:
$01, $80, $06, $E0, $0C, $60, $18, $60, $18, $60, $18, $60, $00, $60, $00, $C0, $01, $C0, $01, $80, $03, $00, $06, $00, $0C, $00, $18, $00, $30, $00, $60, $00, $FF, $80, $7F, $80, $40, $80
These bytes are printed left-to-right, top-to-bottom, setting pixels on the screen.
By following these steps, you can print any character from the BDF font set, adjusting for offsets, bounding box dimensions, and other necessary calculations. The approach can be generalized for any character in the font set, allowing flexible and efficient rendering of text on the display.
00000001100 00000
00000110111 00000
00001100011 00000
00011000011 00000
00011000011 00000
00011000011 00000
00000000011 00000
00000000110 00000
00000001110 00000
00000001100 00000
00000011000 00000
00000110000 00000
00001100000 00000
00011000000 00000
00110000000 00000
01100000000 00000
11111111100 00000
01111111100 00000
01000000100 00000
When printing multiple characters sequentially, the position adjustment for each character can be handled by the DwidthOffsetX and DwidthOffsetY values, rather than recalculating the position based on the bounding box offsets for each individual character. This method simplifies the printing of consecutive characters, as the spacing is automatically managed.
Steps for Printing Multiple Characters:
After printing the first character, the position of the next character will be calculated by adding the DwidthOffsetX and DwidthOffsetY values for each character.
Process:
First Character:
Print the first character at the starting position (X_Pos, Y_Pos) using the procedure we discussed earlier. The position adjustments for this character are based on the bounding box offsets: X_Pos + Abs(BoundingBoxX) - 1 and Y_Pos + Abs(BoundingBoxY) - 1.
Subsequent Characters:
For each subsequent character, use the DwidthOffsetX and DwidthOffsetY to adjust the position relative to the previous character. This allows you to move the print position automatically without manually calculating the offset for each individual character.
For instance, if DwidthOffsetX for the next character is $0B (11 pixels) and DwidthOffsetY is $00, the new position for the next character would be:
X_Pos = X_Pos + DwidthOffsetX (11 pixels)
Y_Pos = Y_Pos + DwidthOffsetY (0 pixels)
This ensures that each character is spaced correctly, and the print positions will be calculated as you move through the string.
Continue Printing:
Repeat this process for each character in the string. After printing one character, the position for the next one is automatically adjusted using DwidthOffsetX and DwidthOffsetY from the current character’s data.
Example:
For a string of characters like "123", here's how the positions would be updated:
Print "1" at (X_Pos, Y_Pos) using the initial offset (BoundingBoxX, BoundingBoxY).
Print "2" at (X_Pos + DwidthOffsetX_1, Y_Pos + DwidthOffsetY_1), where DwidthOffsetX_1 and DwidthOffsetY_1 are the offsets for character "1".
Print "3" at (X_Pos + DwidthOffsetX_2, Y_Pos + DwidthOffsetY_2), where DwidthOffsetX_2 and DwidthOffsetY_2 are the offsets for character "2".
Benefits of Using DwidthOffsetX and DwidthOffsetY:
Consistency: The characters will be evenly spaced according to the font’s design, without needing manual calculations for each individual character.
Efficiency: You only need to adjust the X and Y positions once for each character, speeding up the rendering process for strings.
Scalability: This method works seamlessly with longer strings, as the spacing between characters is handled automatically.
Once the first character is printed, the subsequent characters will be printed at the correct offsets using DwidthOffsetX and DwidthOffsetY, ensuring consistent spacing and alignment across the entire string. This simplifies the printing process and eliminates the need for manual positioning of each character.
Created with the Personal Edition of HelpNDoc: Step-by-Step Guide: How to Turn Your Word Document into an eBook